Workflow
Overview
The Workflow plugin forms with the Access plugin and the WFNet plugin a Workflow Management System (WfMS). For this the WFNet-plugin provides a task transition and a special formalism and the Access plugin provides a role management component that allows creation of roles and rules. The Workflow plugin offers a workflow engine that allows the management of workflows and firing the task transitions. The engine is controlled by two tools that are provided by the plugin. First the !Admin-tool which allows a administrator to manage users, roles and tasks and second a AgendaGui that is used by a user to work with the work items which are assigned to the role of the user.
The workflow engine can be used remotly and it is optionally possible to use a SQL database which stores the users, roles and so on. The Workflow plugin as well as the Access plugin and in parts the WFNet plugin were created by Thomas Jacob(see Jacob).
Usage
The aforementioned tools are found in plugin -> Workflow Tools. Both tools require a running workflow engine. This means two things, first Renew has to be started with certain parameters set and second the simulation needs to be running (with the "workflow compiler" formalism, see WFNet). The needed parameters are the workflow adaptor this can be set by "-Dde.renew.access.adaptor= <wfadaptor>" and <wfadaptor> can be either "de.renew.workflow.ResourceBundleAdaptor" or "de.renew.workflow.DatabaseAdaptor" and depending on the adapter additional information have to be provided. For the "ResourceBundleAdaptor" this is the location of the access.properties and workflow.properties and in case of the "DatabaseAdaptor" that are information about the database. Instead of starting Renew and setting the parameters with the commandline it is recommended to use a startscript instead, the included startscripts that come with the examples can be used as a reference.
The setup of the workflow engine will now be described on the basis of the "ResourceBundleAdaptor", the setup for the database variant is very similar (see the phoneshop example for comparison ). Note that the AdminTool is only fully useable with the database.
For the "ResourceBundleAdaptor" the access.properties defines the different roles of the system, the users with there login data and associated roles and rules which contain the roles. The workflow.properties defines the tasks with associated rules, class, priority and description as well as the forms if any. If there are forms there should also be a <formname>.properties for each form which includes the different fields of the form. The access.properties and workflow.properties are the only mandatory files for the "ResourceBundleAdaptor", form properties and other files like custom classes are only to be created if needed.
access.properties:
roles = superrole, role1, administrator,...

roles.superrole.description = Superrole
roles.employee.superroles =

roles.administrator.description = Administrator
roles.administrator.superroles = superrole

roles.role1.description = Subrole
roles.role1.superroles = superrole
...
administrator = administrator

persons = Person1, Person2,...

persons.Person1.fullName = Person One
persons.Person1.password = Passwort
persons.Person1.roles = role1,administrator

persons.Person2.fullName = Person Two
persons.Person2.password = Passwort2
persons.Person2.roles = role1
...

rules = rule1,rule2,...
rules.rule1.term = role1
...
workflow.properties:
tasks = task1, task2, ...

tasks.task1.description = Description of Task1
tasks.task1.class = de.renew.workflow.FormTaskImpl
tasks.task1.priority = 2
tasks.task1.rule = rulefortask1

tasks.task2. ...
...

administrator = administrator

forms = formfortask1, ...
After the setup the simulation of a net can be started. The net (or nets as a task can also include a subworkflow, see phoneshop example) should include task-transition (from the WFNet plugin) for every task mentioned in the workflow.properties. As mentioned on the WFNet plugin page a task transition needs a inscription with the following syntax: [taskName,parameter(,result(,priority))]
- taskName - The name of the task, has to be in the workflow.properties
- parameter - The input for the task, the type is determined by the .class entry for the task in the workflow.properties
- result - (optional) The output of the task, for example this could be a filled form.
- priority - (optional) Overwrites the priority in the workflow.properties.
A very minimalist example and a more complex example with custom classes are included with the plugin and described here.
Examples
There are two examples included one called mwe short for minimal working example is very the simple the other called phoneshop is quite complex and shows the setup for a imaginary phoneshop.
Minimal Working Example
To start the mwe example use the mwe.sh. This will start Renew with correct parameters and load the mwenet. The example consist of only two task transition and one of them is a form task. After the start of the simulation (with ctrl-r) the AgendaGui (Plugins -> Workflow Tools) can be started with "Minimum" as name and password. After successfully logging in execute the manual transition and the first task should appear in the tool. To start working on the task click "Request" and the form will open. In this case the form only has one checkbox element. Check the box or not and click ok and notice that the token moves forward in the net and the last task of this example appears. Also do note that the token is actually the filled form with minimumelement=false or =true depending on the previous choice. Proceed with the new task as with the one before. As the new task is not a form task but a "ConfirmedTask" it won't open a form window and instead will appear in the "Requested work items" section where it can be completed or canceled. The AdminTool can also be used with "Adminos" as user name and password.
Phoneshop Example
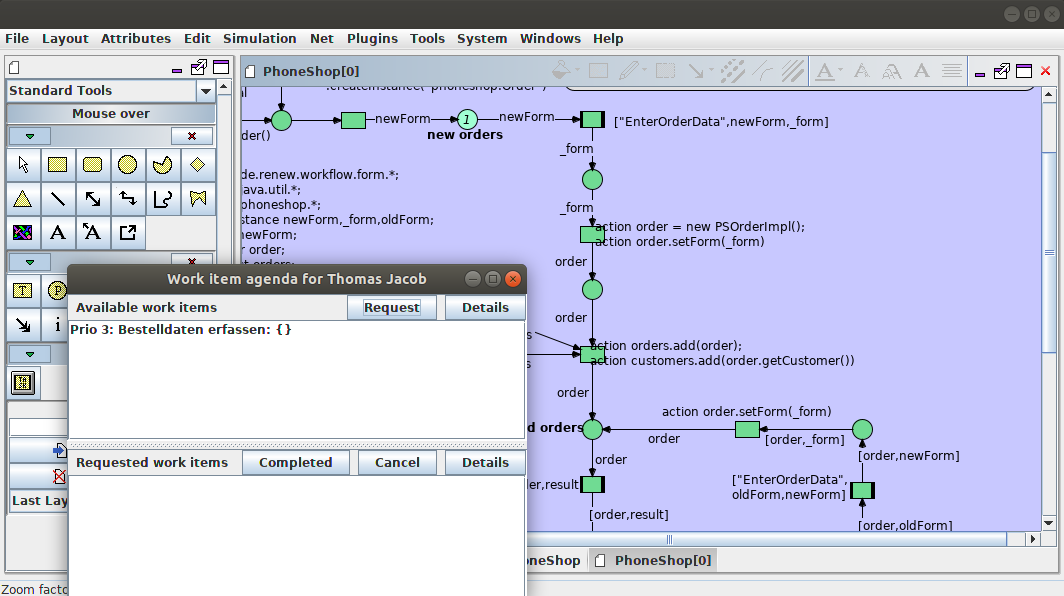
The other example is for an imaginary phoneshop. As this example uses custom classes the .java files need to be compiled first. This can be done with executing "ant phoneshop" in the Workflow folder. The example can then be started with the phoneshop.sh or phoneshopDB.sh. The first uses the "ResourceBundleAdaptor" and the later the "DatabaseAdaptor". Either way Renew will be started with 3 three nets opened. The main net is Phoneshop, the other nets namely CheckOrder and DeliverOrder are subnets. After the simulation is started the two Tools can be used with for example "Thomas" as user name and password. The user Thomas has all rights and can execute all tasks. Several other users are defined in the access.properties and can be used to demonstrate the access restrictions. To start a workflow process the manual transition in the top left corner should be executed. A work item should appear in the AgendaGui and after it's requested a window will open with an order form. After the request the token will move to the transition to show that the task is in progress. If the newly opened window is closed with "cancel" the token will return to its former place and the workitem will reappear. If on the other hand the form is filled and closed with "ok" the token will move on. The other tasks of the process can be executed in the same way.
The following pictures show a simple procedure.


References
Jacob, Thomas (2002). "Implementierung einer sicheren und rollenbasierten Workflowmanagement- Komponente für ein Petrinetzwerkzeug". Diploma Thesis. Vogt-Kölln Str. 30, D-22527 Hamburg: Universität Hamburg, Fachbereich Informatik
Attachments (4)
- Workflow-1.png (98.2 KB ) - added by 6 years ago.
- Workflow-2.png (105.3 KB ) - added by 6 years ago.
- Workflow-3.png (98.0 KB ) - added by 6 years ago.
- Workflow-4.png (108.2 KB ) - added by 6 years ago.
Download all attachments as: .zip